
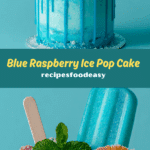
Blue Raspberry Ice Pop Cake
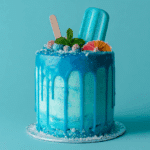
A delightful frozen dessert that combines the nostalgia of blue raspberry ice pops with a tender cake base and a cloud-like whipped topping. Perfect for hot summer days, this cake is as visually striking as it is refreshing, offering bursts of fruity flavor in every bite.
Why You’ll Love This Recipe
-
Effortless Assembly: Minimal baking and mostly no-cook steps make this a stress-free treat.
-
Eye-Catching Presentation: Vivid blue pops arranged atop a snowy white base create an impressive centerpiece.
-
Perfect for Gatherings: Serves a crowd and stays frozen, so you can prepare it in advance.
-
Customizable: Swap in any flavor of ice pop or cake mix to suit your taste.
Ingredients
-
1 box white cake mix (plus ingredients called for on the box: typically eggs, oil, water)
-
12 blue raspberry ice pops (approximately 3.5 oz each)
-
1 (8-ounce) tub whipped topping, thawed
-
Optional garnish: fresh raspberries or mint sprigs
(Tip: You can find the complete list of ingredients and their measurements in the recipe card below.)
Directions
-
Prepare the Cake
-
Preheat the oven to 350°F (175°C).
-
In a mixing bowl, combine the cake mix, eggs, oil, and water according to the package instructions.
-
Pour the batter into a 9×13-inch baking pan lined with parchment or lightly greased.
-
Bake for 25–30 minutes, or until a toothpick inserted into the center comes out clean.
-
Allow the cake to cool completely in the pan on a wire rack.
-
-
Arrange the Ice Pops
-
Once the cake has cooled, remove the wrappers from the ice pops.
-
Insert the ice pops, stick-end down, evenly across the surface of the cake in three rows of four. Ensure they stand upright and are spaced uniformly.
-
-
Top with Whipped Topping
-
Spread the thawed whipped topping over the exposed cake surface, smoothing it around the ice pops to conceal the cake edges.
-
If desired, garnish with fresh raspberries or mint for added color and flavor.
-
-
Freeze
-
Cover the pan tightly with plastic wrap or foil.
-
Transfer to the freezer and chill for at least 4 hours, or until the whipped topping is firm and the ice pops are fully frozen into the cake.
-
-
Serve
-
Slice between the ice pops to serve individual cake slices with one ice pop each.
-
Keep remaining portions frozen until ready to serve.
-
Servings and timing
-
Yields: 12 servings
-
Prep time: 15 minutes
-
Bake time: 25–30 minutes
-
Freeze time: 4 hours
-
Total time: Approximately 4 hours 45 minutes
Variations
-
Flavor Swaps: Use cherry, lime, or orange ice pops for a different palette of flavors.
-
Cake Base: Substitute yellow or chocolate cake mix for a more decadent foundation.
-
Layered Look: Slice the cooled cake in half horizontally, spread whipped topping between layers, and reassemble before adding the ice pops.
-
Dairy-Free Option: Use a dairy-free whipped topping alternative to accommodate dietary needs.
Storage/reheating
-
Storage: Keep the cake covered in the freezer for up to 2 weeks. Ensure it is well-wrapped to prevent freezer burn.
-
Serving from Frozen: For easy slicing, let the cake sit at room temperature for 5 minutes before cutting.
-
Reheating: Not applicable; this dessert is best served frozen.
FAQs
What type of cake mix works best for this recipe?
A white or yellow cake mix offers a neutral base that lets the blue raspberry flavor shine. However, you may use any flavor you prefer, such as chocolate or lemon.
Can I make the cake from scratch instead of using a mix?
Yes. A simple vanilla cake batter—made with flour, sugar, butter, eggs, baking powder, and milk—works well. Follow your favorite scratch recipe.
How do I prevent the whipped topping from melting too quickly?
Ensure the cake is completely cool before applying the whipped topping and return the dessert to the freezer immediately after assembly.
Can I use homemade fruit pops instead of store-bought?
Absolutely. Homemade pops made from pureed fruit and a sweetener will add freshness and allow you to control sugar levels.
Is it possible to make individual portions?
Yes. Bake the cake in muffin tins or mini loaf pans and insert smaller pops for personalized servings.
What if I don’t have a 9×13-inch pan?
Use two 8×8-inch pans; adjust the number of ice pops accordingly or overlap them slightly to fit.
Can I prepare this cake a day in advance?
You can assemble and freeze the cake up to 24 hours before serving. Just keep it well wrapped.
How do I cleanly cut slices between the ice pops?
Use a warm, sharp knife. Dip it in hot water and wipe dry before each cut for clean edges.
Can I add fillings or layers between the cake and ice pops?
Yes. A thin layer of fruit jam or sweetened cream cheese spread can add another flavor dimension.
Why did my ice pops slide out of the cake?
Allow the cake to cool fully and insert the pops firmly. If the cake is too moist, the pops may not anchor securely.
Conclusion
This Blue Raspberry Ice Pop Cake is a show-stopping yet uncomplicated dessert perfect for summer gatherings, picnics, or simply cooling off on a hot day. Its vibrant appearance and playful combination of cake, creamy topping, and fruity ice pops will delight guests of all ages. Prepare it ahead of time, store it in the freezer, and serve whenever the mood for something sweet and icy strikes. Enjoy this whimsical treat that marries nostalgia with modern dessert flair!
Blue Raspberry Ice Pop Cake
A patriotic triple-layer cake inspired by rocket pop ice pops, featuring layers of cherry, lime, and blue raspberry flavored cake with coordinating buttercream frosting.
- Author: sarra
- Prep Time: 35 minutes
- Cook Time: 40 minutes
- Total Time: 1 hour 15 minutes
- Yield: 10–12 servings 1x
- Category: Dessert
- Method: Baking
- Cuisine: American
- Diet: Vegetarian
Ingredients
- 3 1/2 cups (498 g) all-purpose flour
- 1 Tbsp plus 1 tsp baking powder
- 1/2 tsp salt
- 6 large egg whites
- 1 1/2 cups (360 ml) whole milk, at room temperature
- 1 cup (226 g) unsalted butter, at room temperature
- 1 1/2 cups (300 g) granulated sugar
- 3/4 cup (180 ml) boiling water
- 1 package (3 oz) Cherry Jell-O
- 1 package (3 oz) Berry Blue Jell-O
- 1 envelope (0.25 oz) unflavored powdered gelatin
- 1/2 dram (about 1/4 tsp) LorAnn lime flavoring oil
- 1 tsp red gel food color
- 1 tsp sky blue gel food color
- 1 lb unsalted butter, at room temperature (for frosting)
- 2 lbs confectioners’ sugar
- Pinch of salt
- 1/4–1/3 cup (60–80 ml) milk or cream
- 2 tsp vanilla extract
- 1 tsp red gel food color (for piping)
- 1 tsp sky blue gel food color (for piping)
- Assorted red, white, and blue sprinkles
Instructions
- Preheat oven to 350 °F (175 °C). Coat three 6×2-inch round cake pans with a flour-based baking spray.
- Sift together flour, baking powder, and salt in a bowl; whisk egg whites and milk in another bowl.
- In a mixer, beat 1 cup butter until creamy. Add sugar and beat until fluffy, scraping down the bowl as needed.
- Alternate adding flour mixture and egg-white mixture to the butter, beginning and ending with flour. Beat on medium-low until smooth. Divide batter evenly among three bowls (≈1⅔ cups each).
- Divide boiling water into three small bowls (¼ cup each). In one bowl, stir cherry Jell-O and red gel color; in another, stir Berry Blue Jell-O and sky blue gel color; in the third, stir unflavored gelatin and lime oil.
- Fold each flavored gelatin mixture into a bowl of batter. Pour each into a prepared pan, filling ¾ full.
- Bake 35–40 minutes, until a toothpick inserted in centers comes out clean. Cool completely and level layers if needed.
- Meanwhile, make buttercream: beat 1 lb butter until creamy. Add confectioners’ sugar and salt; mix until thick and crumbly.
- Gradually add milk or cream until frosting is thin enough to whip. Beat in vanilla. Beat on high 3–4 minutes until nearly white.
- Stack layers: spread a little frosting on the blue layer, top with the white layer, then the red. Apply a thin crumb coat to the assembled cake and chill until firm.
- Divide remaining frosting into three portions; tint one red, one blue, leave one white. Pipe three thick horizontal bands—blue at bottom third, white in middle, red at top—and smooth with a bench scraper.
- Pipe extra white frosting on top and garnish with assorted sprinkles. Store cake at room temperature under plastic wrap.
Notes
- Use three 6×2-inch pans for tall, even layers.
- Gelatin may not fully dissolve in boiling water; it will dissolve in the batter.
- Level the white layer if it puffs higher than the red and blue layers.
- Chill cake after the crumb coat to make final decorating easier.
- Store at room temperature; the cake holds up well for up to 2 days.
Keywords: rocket pop layer cake, blue raspberry cake, patriotic cake, Jell-O cake