
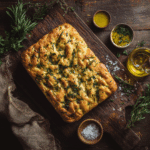
Cheese & Herb Focaccia
Short Description
A rustic, golden focaccia infused with aromatic herbs and a generous layer of melty cheese. With a tender, pillowy crumb and crisp, olive oil–kissed exterior, this Cheese & Herb Focaccia is perfect for serving alongside soups, salads, or enjoyed on its own.
Why You’ll Love This Recipe
This focaccia combines fragrant herbs with the indulgent richness of cheese, creating a harmonious flavor profile that’s both savory and comforting. It’s slightly chewy yet delightfully airy, with a golden crust that shimmers from olive oil and a cheesy topping that creates a luscious finish. Whether as an appetizer, snack, or side, it elevates any meal.
Ingredients
(Tip: You can find the complete list of ingredients and their measurements in the recipe card below.)
-
All-purpose flour
-
Active dry yeast
-
Warm water
-
Olive oil (plus a little extra for drizzling)
-
Salt
-
Granulated sugar
-
Mixed Italian herbs (such as rosemary, thyme, oregano, or a blend)
-
Grated cheese (Parmesan, mozzarella, or a combination)
Directions
-
Activate the yeast: In a small bowl, whisk together warm water, sugar, and active dry yeast. Let sit for 5–10 minutes until foamy.
-
Prepare the dough: In a large bowl, combine all-purpose flour and salt. Add the yeast mixture and a portion of olive oil. Stir until a sticky dough forms.
-
First rise: Cover the bowl with plastic wrap or a damp cloth. Let the dough rise in a warm place until doubled in size—about 1 to 1½ hours.
-
Shape and second rest: Transfer the dough to a well-oiled baking sheet or pan. Using oiled fingers, press it out evenly to fill the pan. Let it rest for another 20–30 minutes.
-
Preheat & prep: Preheat the oven. While the dough rests, sprinkle the top surface with mixed herbs, grated cheese, and a drizzle of olive oil.
-
Bake: Place in the oven and bake until the crust is golden and the cheese is melted and bubbly.
-
Cool & serve: Remove and let cool for a few minutes. Slice into pieces and serve warm or at room temperature.
Servings and Timing
-
Servings: Makes approximately 8–10 pieces (serves 4–6 people).
-
Prep time: 15–20 minutes (plus resting and rising times).
-
Rising time: About 1 to 1½ hours for the first rise, plus 20–30 minutes for a second rest.
-
Bake time: Approximately 20–25 minutes.
-
Total time: Around 2 hours from start to finish.
Variations
-
Cheese options: Swap or combine different cheeses such as Gruyère, fontina, cheddar, or cheddar‑mozzarella for varying flavor and melt.
-
Herb blends: Use fresh herbs if available (e.g. fresh rosemary sprigs, thyme, basil) or even a sprinkle of garlic powder or minced garlic.
-
Toppings: Add toppings like cherry tomato halves, olives, caramelized onions, or roasted garlic for extra flair.
-
Whole wheat version: Substitute half the all-purpose flour with whole wheat flour for a nuttier, heartier bread. Adjust water as needed to account for the denser flour.
-
Flavored oil: Infuse olive oil with garlic or chili flakes before drizzling to boost aroma and subtle heat.
Storage / Reheating
-
Storage: Once cooled completely, store focaccia in an airtight container or resealable bag at room temperature for up to 2 days. For longer storage (up to a week), wrap well and refrigerate. For best texture, bring to room temperature before serving.
-
Freezing: Wrap in foil or place in freezer bags and freeze for up to 2–3 months.
-
Reheating:
-
Oven method: Preheat to 175 °C (350 °F), place on a baking sheet, and warm for 5–10 minutes until heated and crisp.
-
Toaster or oven‑toaster: Reheat individual slices for 2–4 minutes until warm and slightly crispy on edges.
-
Microwave (least recommended): Heat slices for 20–30 seconds; expect a softer crust.
-
FAQs
1. How do I know when the yeast is active?
If the mixture becomes foamy or bubbly within 5 to 10 minutes, the yeast is active and ready to use. If it remains flat, the yeast may be old or the water was too hot or cold.
2. Can I use instant yeast instead of active dry yeast?
Yes—you can use instant yeast. Mix it directly into the flour and reduce the water slightly. The rising times remain similar.
3. What’s the best temperature for the water when activating yeast?
Use warm water around 40–43 °C (105–110 °F). Water that’s too hot can kill the yeast, while water that’s too cold slows fermentation.
4. Can I make the dough ahead of time?
Absolutely. You can refrigerate the dough after the first rise, covered, for up to 24 hours. Let it come to room temperature and complete its second rise before baking.
5. My focaccia is dense—what went wrong?
Possible causes include using too much flour, not enough water, not letting it rise long enough, or yeast that’s inactive. Ensure a sticky dough and give it adequate rising time.
6. How can I get big, airy holes in the crumb?
Use a higher hydration (more water), handle the dough gently to retain gas, and let the dough rise until visibly doubled. Folding the dough gently during the first rise can help build structure.
7. Can I make this gluten‑free?
Yes—with a good gluten‑free all-purpose flour blend that includes xanthan gum. Expect a slightly different texture and possibly shorter rise time.
8. Can I skip the second rise?
You can, but the focaccia will be denser and less airy. The second rest helps develop structure and results in a lighter crumb.
9. Can I bake this in a skillet instead of a baking sheet?
Yes—a cast iron or oven-safe skillet works great. It gives a crispier bottom crust; just cook on baking sheet or prepare the skillet the same way.
10. What can I serve with Cheese & Herb Focaccia?
This focaccia pairs well with minestrone or tomato soup, alongside charcuterie or cheese boards, or simply dipped in extra virgin olive oil, balsamic reduction, or flavored spreads.
Conclusion
Cheese & Herb Focaccia is a versatile and satisfying bread that’s as pleasing to bake as it is to eat. Its fragrant herbs, golden crust, and melty cheese make it a versatile choice for any meal—whether it’s a cozy weeknight dinner, a gathering, or a solo indulgence. With easy ingredients and simple steps, you’ll love how this recipe brings warm, savory delight to your table.
Cheese & Herb Focaccia
A soft, fluffy Italian bread topped with a blend of cheeses and aromatic herbs, perfect as a side or appetizer.
- Author: sarra
- Prep Time: 1 hour 15 minutes
- Cook Time: 25 minutes
- Total Time: 1 hour 40 minutes
- Yield: 1 large focaccia (about 8 servings) 1x
- Category: Bread
- Method: Baking
- Cuisine: Italian
- Diet: Vegetarian
Ingredients
- 4 cups all-purpose flour
- 1 tablespoon sugar
- 1 tablespoon instant yeast
- 1 1/2 teaspoons salt
- 1 1/2 cups warm water (about 110°F)
- 1/4 cup olive oil, plus more for drizzling
- 1 cup shredded mozzarella cheese
- 1/2 cup grated Parmesan cheese
- 1 tablespoon chopped fresh rosemary
- 1 tablespoon chopped fresh thyme
- 1 teaspoon garlic powder (optional)
- Coarse sea salt, for topping
Instructions
- In a large bowl, mix flour, sugar, yeast, and salt.
- Add warm water and 1/4 cup olive oil, stirring until a sticky dough forms.
- Knead the dough on a floured surface for about 5–7 minutes until smooth.
- Place dough in a greased bowl, cover, and let rise in a warm place for 1 hour or until doubled in size.
- Preheat oven to 425°F (220°C). Grease a baking sheet or line it with parchment paper.
- Press dough into the pan, spreading it out with your fingers.
- Use your fingers to dimple the surface of the dough.
- Drizzle with olive oil and sprinkle with mozzarella, Parmesan, herbs, garlic powder (if using), and sea salt.
- Bake for 20–25 minutes, or until golden brown and the cheese is bubbling.
- Let cool slightly before slicing and serving.
Notes
- Use fresh herbs for the best flavor.
- Try adding caramelized onions or olives for variation.
- Best enjoyed warm but can be reheated in the oven.
Nutrition
- Serving Size: 1 slice (1/8 of focaccia)
- Calories: 270
- Sugar: 1g
- Sodium: 360mg
- Fat: 12g
- Saturated Fat: 4g
- Unsaturated Fat: 7g
- Trans Fat: 0g
- Carbohydrates: 33g
- Fiber: 1g
- Protein: 9g
- Cholesterol: 15mg
Keywords: focaccia, cheese bread, herb bread, Italian bread, easy focaccia


