
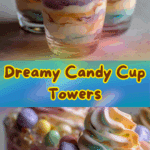
Dreamy Candy Cup Towers
A whimsical and delightful dessert, Dreamy Candy Cup Towers are the perfect treat for parties, holidays, or any celebration that calls for a touch of sweetness and creativity. These towers are made by stacking candy-filled cups into a fun, eye-catching arrangement that both kids and adults will love.
Why You’ll Love This Recipe
Dreamy Candy Cup Towers are not only visually stunning but also incredibly versatile. They can be customized with any type of candy to suit the occasion, making them a wonderful addition to themed parties or seasonal celebrations. The towers are easy to assemble, require no baking, and are a fun activity for families and kids to create together.
Ingredients
(Tip: You can find the complete list of ingredients and their measurements in the recipe card below.)
-
Small paper or plastic cups
-
Assorted candies (chocolates, gummies, hard candies, lollipops, etc.)
-
Frosting or edible glue (for stacking and stability)
-
Decorative sprinkles or edible glitter
-
Optional: mini toys or trinkets for surprise elements
Directions
-
Begin by filling each cup with your choice of candies.
-
Spread a thin layer of frosting or edible glue around the rim of one filled cup.
-
Carefully place another cup on top, slightly pressing down to secure.
-
Continue stacking until you have created a tower of your desired height.
-
Decorate the exterior of the tower with sprinkles, glitter, or additional candies for visual appeal.
-
Chill for 10–15 minutes if using frosting, to allow it to set.
-
Serve as a centerpiece dessert or party favor.
Servings and timing
This recipe makes approximately 12 candy cup towers, depending on the size of your cups and amount of candy used. Preparation takes about 20–25 minutes, with an additional 10–15 minutes of chilling if frosting is used for stacking.
Variations
-
Holiday Edition: Use red and green candies for Christmas, or pastel colors for Easter.
-
Chocolate Lover’s Tower: Fill exclusively with different varieties of chocolates.
-
Healthy Twist: Add dried fruit, nuts, or yogurt-covered raisins for a less sugary option.
-
Themed Towers: Match candy colors to a birthday theme or school spirit colors.
-
Mini Towers: Create smaller versions with two or three cups for individual servings.
storage/reheating
Store assembled towers in an airtight container at room temperature for up to 5 days. If using frosting, keep them refrigerated to maintain structure. No reheating is necessary, but if chilled, allow towers to sit at room temperature for 10–15 minutes before serving for best texture.
FAQs
What type of cups work best for candy cup towers?
Small, sturdy paper or plastic cups work best, as they hold candy well and can stack without collapsing.
Can I use hot glue instead of frosting for stability?
If the towers are purely decorative, hot glue can be used. For edible towers, frosting or edible glue is recommended.
How tall can I make these towers?
Towers of 3–5 cups are most stable. Taller towers may require additional support.
Can I prepare these towers in advance?
Yes, you can prepare them 1–2 days in advance if stored properly in an airtight container.
What candies work best?
Individually wrapped candies, gummies, and chocolates work best. Avoid sticky candies that may clump.
Can these be used as party favors?
Absolutely, smaller towers wrapped in cellophane make wonderful party favors.
How do I keep the cups from toppling over?
Ensure that each cup is evenly filled and secured with frosting or edible glue before stacking.
Can I make these gluten-free?
Yes, simply choose gluten-free candies and ensure your cups and decorative items are safe.
Are these kid-friendly to make?
Yes, children can help fill and decorate the cups, though adult supervision is recommended for stacking.
Can I add a surprise inside the towers?
Yes, you can hide small toys, coins, or trinkets inside one of the cups for a fun surprise.
Conclusion
Dreamy Candy Cup Towers are a simple yet stunning treat that combines creativity, fun, and sweetness into one delightful project. Whether used as a party centerpiece, a festive holiday treat, or a whimsical dessert activity with kids, these towers will bring joy and a touch of magic to any occasion.
Dreamy Candy Cup Towers
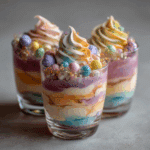
Dreamy Candy Cup Towers are fun, colorful, and sweet layered dessert cups stacked like little towers, perfect for parties or special occasions. They combine candy, pudding, whipped cream, and crunchy elements for a delightful treat.
- Prep Time: 20 mins
- Cook Time: 0 mins
- Total Time: 20 mins
- Yield: 6 servings 1x
- Category: Dessert
- Method: No-Bake
- Cuisine: American
- Diet: Vegetarian
Ingredients
- 2 cups assorted colorful candies (gummies, chocolates, or candy-coated pieces)
- 2 cups vanilla or chocolate pudding
- 1 cup whipped cream
- 1 cup crushed cookies or graham crackers
- 1/2 cup sprinkles
- Maraschino cherries (for topping)
- Clear plastic cups (for layering)
Instructions
- Prepare pudding according to package directions and let it chill.
- In each clear cup, add a layer of crushed cookies at the bottom.
- Add a spoonful of pudding on top of the cookie layer.
- Place a layer of assorted candies over the pudding.
- Add a layer of whipped cream to create height and fluffiness.
- Repeat the layers until the cup is filled to the top, creating a tower effect.
- Finish with sprinkles and a maraschino cherry on top.
- Chill in the refrigerator for 30 minutes before serving.
Notes
- You can mix and match different candies for variety.
- Use sugar-free pudding and light whipped cream for a lighter version.
- Best served chilled and fresh.
Nutrition
- Serving Size: 1 cup
- Calories: 320
- Sugar: 35g
- Sodium: 180mg
- Fat: 12g
- Saturated Fat: 7g
- Unsaturated Fat: 4g
- Trans Fat: 0g
- Carbohydrates: 52g
- Fiber: 1g
- Protein: 3g
- Cholesterol: 20mg
Keywords: candy cup towers, layered dessert, party treat, no bake dessert, fun kids recipe


