
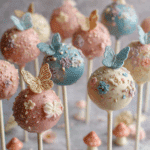
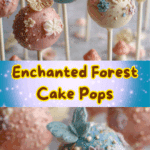
Enchanted Forest Cake Pops
Step into a world of whimsy and magic with these Enchanted Forest Cake Pops. Featuring moist cake centers coated in a chocolate shell and decorated with woodland-inspired details, these cake pops are perfect for birthdays, themed parties, or simply adding a fairytale touch to your dessert table.
Why You’ll Love This Recipe
These cake pops are more than just treats—they are a centerpiece for any gathering. With their charming forest-inspired decorations, they capture the essence of a fairytale while delivering a rich, moist, and indulgent bite. They are also highly customizable, allowing you to decorate them as mushrooms, mossy textures, or sparkling woodland orbs to suit your event. Plus, they are bite-sized, making them easy to serve and enjoy without utensils.
Ingredients
(Tip: You can find the complete list of ingredients and their measurements in the recipe card below.)
-
Baked cake (flavor of choice, such as chocolate or vanilla)
-
Frosting (buttercream or cream cheese frosting works best)
-
Candy melts or couverture chocolate (for coating)
-
Lollipop sticks or cake pop sticks
-
Green candy melts, sanding sugar, or edible glitter (for moss effect)
-
Red candy melts and white sprinkles (for mushroom designs)
-
Edible gold dust or shimmer powder (optional, for magical accents)
Directions
-
Crumble the cooled cake into fine crumbs.
-
Mix in frosting gradually until the mixture holds together when pressed.
-
Roll into evenly sized balls and place them on a parchment-lined tray.
-
Chill in the refrigerator for at least 1 hour.
-
Melt candy melts or chocolate according to package instructions.
-
Dip each lollipop stick into the melted coating before inserting into the cake ball.
-
Dip the cake pops into the melted coating, allowing excess to drip off.
-
Decorate immediately with sprinkles, edible glitter, or colored melts to create a forest-like design.
-
Allow to set completely before serving or storing.
Servings and timing
This recipe makes approximately 24 cake pops.
Preparation time: 30 minutes
Chilling time: 1 hour
Decoration and assembly: 30 minutes
Total time: about 2 hours
Variations
-
Use red candy melts and white sprinkles to design mushroom-shaped pops for a forest theme.
-
Add green sanding sugar or crushed graham crackers dyed with green food coloring to mimic moss.
-
Create a “fairy light” effect by dusting with edible glitter or shimmer powder.
-
Flavor the cake differently—chocolate, red velvet, or matcha sponge can each bring unique flavor and visual appeal.
-
Add a flavored filling such as Nutella, jam, or cookie butter for extra indulgence.
storage/reheating
Store finished cake pops in an airtight container at room temperature for up to 3 days, or in the refrigerator for up to 1 week. If refrigerating, allow them to sit at room temperature for 10–15 minutes before serving for the best texture. Cake pops can also be frozen for up to 2 months; thaw in the refrigerator overnight before enjoying.
FAQs
How far in advance can I make cake pops?
You can make cake pops up to 2 days in advance and store them in the refrigerator. For longer storage, freeze them and decorate closer to serving.
Why are my cake pops cracking?
Cracks usually occur when the cake balls are too cold and the coating is too warm. Allow the cake pops to rest briefly before dipping.
Can I use homemade frosting instead of store-bought?
Yes, homemade buttercream or cream cheese frosting works wonderfully and often provides a fresher flavor.
Do I need a cake pop maker?
No, this recipe relies on rolling cake crumbs with frosting. A cake pop maker is not required.
How do I keep the sticks from falling out?
Dipping the tip of the stick in melted chocolate before inserting into the cake ball helps secure it firmly.
Can I make these without sticks?
Yes, you can shape them into truffles and serve them in mini cupcake liners for a no-stick version.
What type of chocolate works best for coating?
Candy melts are easiest to use because they set quickly, but couverture chocolate gives a richer taste.
How can I make the cake pops look like mushrooms?
Dip the tops in red candy melts, then add white sprinkle dots for a toadstool effect.
Are cake pops suitable for outdoor events?
Yes, but avoid direct sunlight or warm temperatures, as the coating may soften or melt.
Can I color the coating with gel food coloring?
Yes, but use oil-based coloring for candy melts; water-based food coloring can cause seizing.
Conclusion
Enchanted Forest Cake Pops are a delightful blend of whimsy and flavor, perfect for adding a magical touch to your dessert table. With endless opportunities for creative decoration, they not only taste delicious but also serve as a charming edible centerpiece. Whether for a woodland-themed party, a child’s birthday, or simply for fun, these cake pops are sure to enchant every guest.
Enchanted Forest Cake Pops
Whimsical Enchanted Forest Cake Pops decorated with woodland-inspired designs, perfect for themed parties, birthdays, or magical celebrations.
- Prep Time: 30 mins
- Cook Time: 30 mins
- Total Time: 1 hr
- Yield: 24 cake pops 1x
- Category: Dessert
- Method: No-bake (assembly after baking)
- Cuisine: American
- Diet: Vegetarian
Ingredients
- 1 box chocolate cake mix (or homemade chocolate cake)
- 3 large eggs
- 1/2 cup vegetable oil
- 1 cup water
- 1/2 cup chocolate frosting
- 12 oz candy melts (green, brown, or desired forest colors)
- Lollipop sticks
- Sprinkles, edible glitter, or fondant decorations (toadstools, leaves, flowers)
- Styrofoam block or cake pop stand
Instructions
- Bake the chocolate cake according to package or recipe instructions. Allow it to cool completely.
- Crumble the cooled cake into fine crumbs in a large mixing bowl.
- Add chocolate frosting gradually and mix until the texture resembles moist dough.
- Roll the mixture into small, bite-sized balls and place them on a lined baking sheet.
- Insert lollipop sticks into each ball by dipping the tip of the stick into melted candy and pressing it halfway into the cake ball.
- Freeze the cake balls for 15–20 minutes to firm up.
- Melt candy melts according to package instructions until smooth.
- Dip each cake ball into the melted candy coating, gently tapping off excess.
- Decorate with sprinkles, edible glitter, or fondant forest-themed accents while the coating is still wet.
- Place cake pops upright in a Styrofoam block or cake pop stand until set.
Notes
- Make sure the cake balls are chilled but not frozen solid before dipping to prevent cracking.
- Use different shades of candy melts for a magical woodland look.
- Can be stored in an airtight container at room temperature for up to 3 days.
Nutrition
- Serving Size: 1 cake pop
- Calories: 160
- Sugar: 15g
- Sodium: 90mg
- Fat: 7g
- Saturated Fat: 3g
- Unsaturated Fat: 3g
- Trans Fat: 0g
- Carbohydrates: 22g
- Fiber: 1g
- Protein: 2g
- Cholesterol: 15mg
Keywords: enchanted forest cake pops, woodland cake pops, magical dessert, party treats, kids birthday