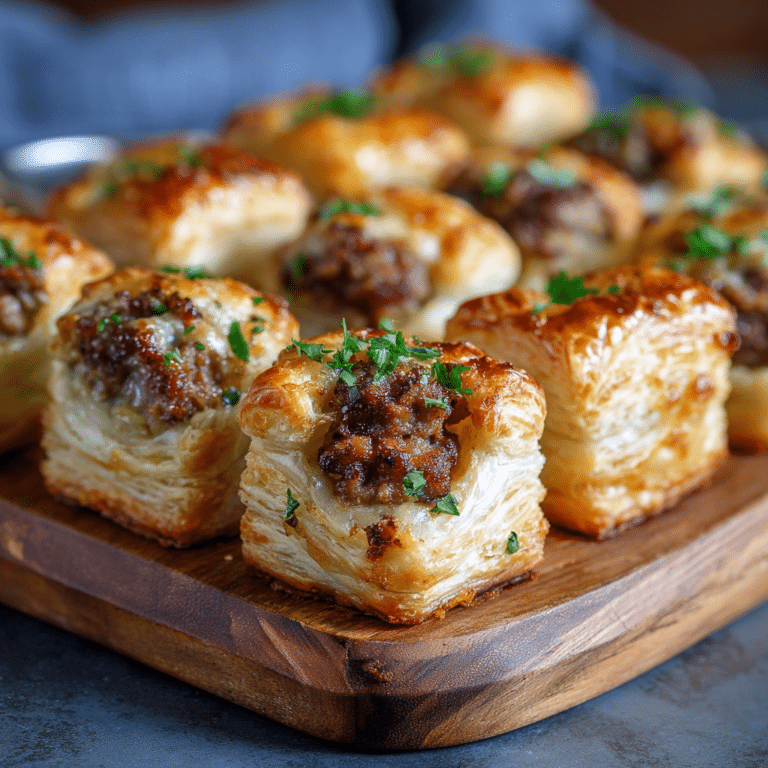
Mini Cheese Tartlets Recipe
If you’re looking for an irresistible bite-sized treat that combines creamy richness with a delicate, flaky base, these Mini Cheese Tartlets are absolute show-stoppers. Each tartlet boasts a luscious, slightly tangy cheese filling nestled inside a golden puff pastry crust that melts in your mouth. What makes these Mini Cheese Tartlets stand out is their elegant simplicity, enhanced by optional caramelized onions or aromatic herbs that take these little delights from simple snacks to sophisticated crowd-pleasers. Whether for a party, an appetizer, or a special teatime snack, these tartlets are sure to impress.

Ingredients You’ll Need
Gathering the right ingredients for these Mini Cheese Tartlets is wonderfully straightforward. Each component plays a crucial role in building a balanced flavor profile and a perfect texture — from the buttery puff pastry to the creamy, tangy cheese filling.
- Puff pastry sheet: The foundation of every tartlet, its flaky layers add that delightful crunch and golden finish.
- Cream cheese (100g): Provides a smooth, rich base with a slight tang that makes the filling irresistible.
- Egg (1): Helps bind the filling together and gives a beautiful gloss to the pastry edges when brushed on.
- Grated cheese (1 tbsp): Adds a subtle sharpness and enhances the cheese flavor for a more decadent bite.
- Salt and thyme: Essential seasonings that elevate the filling’s taste, with thyme bringing a fragrant herbal note.
How to Make Mini Cheese Tartlets
Step 1: Prepare the Puff Pastry Shells
Begin by rolling out your puff pastry sheet slightly and cutting it into small circles that fit your mini tart molds perfectly. The key here is to keep the pastry chilled so it doesn’t become too soft to handle, allowing those beautiful flaky layers to puff up as they bake.
Step 2: Mix the Cheese Filling
In a bowl, combine the cream cheese, egg, grated cheese, salt, and thyme. Whisk until smooth and creamy, ensuring the seasonings are evenly distributed. This filling should be luscious and well-seasoned since it is the star of your Mini Cheese Tartlets.
Step 3: Assemble the Tartlets
Gently press each pastry circle into the mini molds to create the tartlet shells. Spoon the cheese filling carefully into each shell, filling them generously but leaving a little space at the top to avoid overflow during baking.
Step 4: Bake to Golden Perfection
Place your filled tartlets on a baking tray and bake in a preheated oven at 180°C for about 15 minutes. You’ll know they’re ready when the pastry is puffed and golden, and the filling is set with just a delicate, inviting wobble.
How to Serve Mini Cheese Tartlets

Garnishes
While these Mini Cheese Tartlets are delightful on their own, topping them with a sprinkle of fresh thyme, caramelized onions, or even a touch of cracked black pepper adds layers of flavor and a polished look. Fresh herbs add a burst of color that makes every tartlet visually appealing.
Side Dishes
Pair these tartlets with a crisp green salad tossed in a light vinaigrette to balance the richness, or serve alongside a bowl of seasonal roasted vegetables. For a party spread, they pair wonderfully with other finger foods like smoked salmon canapés or marinated olives.
Creative Ways to Present
Consider serving your Mini Cheese Tartlets on a rustic wooden board lined with parchment paper for a charming look, or arrange them on tiered stands for an elegant buffet display. For a fun twist, serve with small bowls of different chutneys or dipping sauces to invite guests to customize their taste experience.
Make Ahead and Storage
Storing Leftovers
If you have any Mini Cheese Tartlets left, store them in an airtight container in the refrigerator for up to two days. This keeps both the filling fresh and the pastry from becoming soggy, so you can enjoy them again without losing that delicious texture.
Freezing
You can freeze uncooked tartlets assembled on a baking sheet, then transfer them to a freezer bag once firm. When you’re ready to bake, pop them in the oven straight from the freezer, adding a few extra minutes to the baking time for perfectly crisp Mini Cheese Tartlets.
Reheating
To revive leftover Mini Cheese Tartlets, warm them gently in an oven at 160°C for about 10 minutes. Avoid microwaving as it tends to soften the pastry, losing that lovely crunch you want to savor.
FAQs
Can I use other types of cheese for the filling?
Absolutely! While cream cheese provides the perfect smooth texture, you can experiment by mixing in goat cheese, ricotta, or a sharp cheddar for different flavor profiles in your Mini Cheese Tartlets.
Is it possible to make these tartlets gluten-free?
Yes, by using a gluten-free puff pastry available at many stores, you can enjoy gluten-free Mini Cheese Tartlets without compromising on the flaky, buttery crust.
How do I prevent the pastry from getting soggy?
Be sure to pre-chill your pastry before baking and avoid overfilling the tartlets. Baking at the right temperature until the crust is golden also helps keep it crisp and flaky.
Can I prepare the filling a day ahead?
Definitely! Preparing the cheese filling a day in advance can enhance the flavors. Just keep it covered and refrigerated, then assemble the tartlets right before baking.
What are some topping ideas beyond caramelized onions and thyme?
Try fresh chives, roasted red peppers, sun-dried tomatoes, or even a pinch of smoked paprika for an unexpected yet delicious twist on your Mini Cheese Tartlets.
Final Thoughts
These Mini Cheese Tartlets are a delightful way to bring a touch of sophistication to any occasion with minimal effort. Their balance of textures and flavors makes them incredibly addictive, and I guarantee they’ll be one of your go-to recipes for elegant entertaining or simply treating yourself. Give them a try—you’re going to fall in love at first bite!