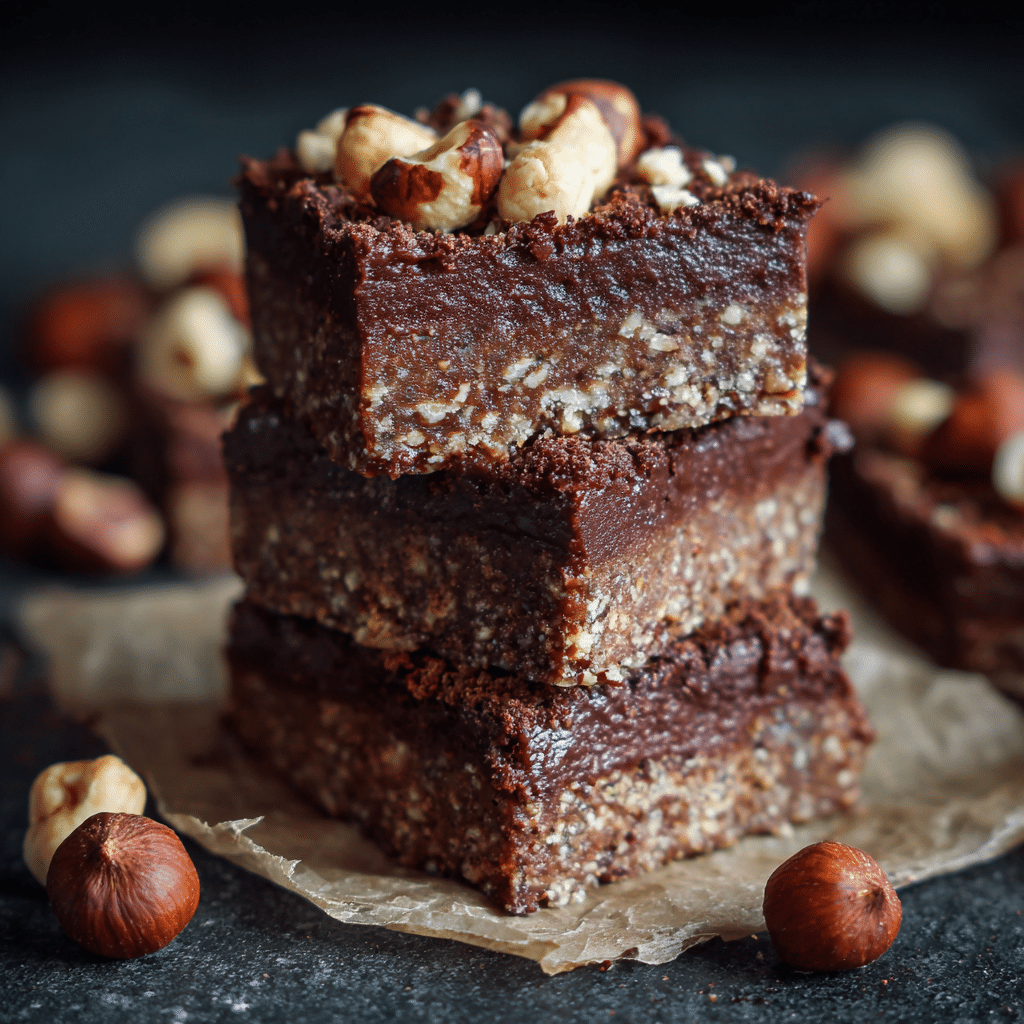
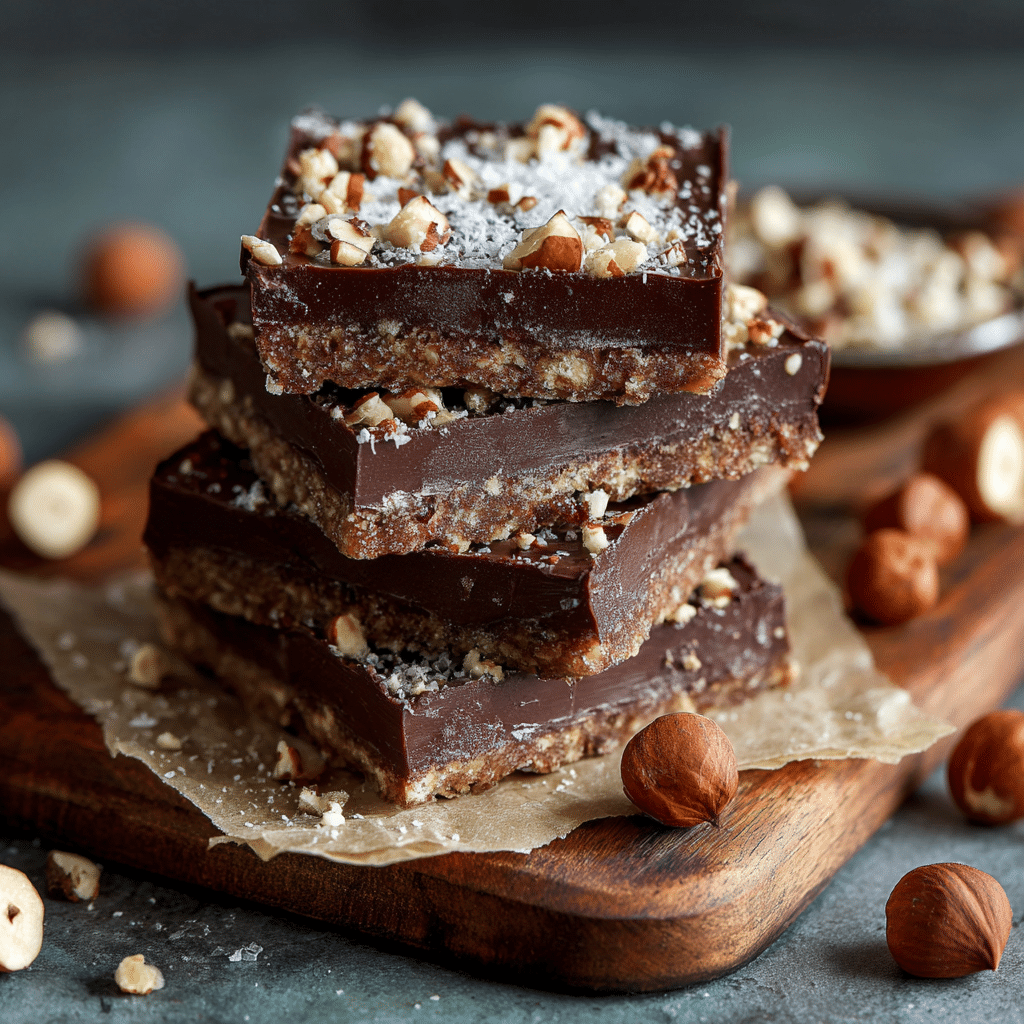
No-Bake Chocolate Hazelnut Bars Recipe
If there’s one treat that perfectly balances indulgence with effortless preparation, it’s these No-Bake Chocolate Hazelnut Bars. Rich layers of creamy Nutella and melted chocolate embrace a crunchy biscuit base, all topped with toasted hazelnuts that provide an irresistible texture. They come together quickly, require no oven time, and transform simple pantry staples into a dessert that feels luxuriously homemade. Whether you’re craving an afternoon pick-me-up or need a foolproof crowd-pleaser, these bars are your new secret weapon in the kitchen.
Ingredients You’ll Need
The list of ingredients for No-Bake Chocolate Hazelnut Bars is delightfully short, but every component plays an essential role. Together, they build layers of flavor and texture that make this treat truly special.
- Crushed biscuits: Provide a sturdy, crunchy base that contrasts beautifully with the creamy toppings.
- Nutella: Adds that iconic chocolate and hazelnut creaminess, rich and dreamy.
- Melted chocolate: Gives a silky, smooth layer that binds and intensifies the chocolate flavor.
- Chopped hazelnuts: Add crunch and a toasty nuttiness that elevates each bite.
How to Make No-Bake Chocolate Hazelnut Bars
Step 1: Prepare the Biscuit Base
Start by rough crushing your favorite biscuits until you get a fine, sandy texture with some small chunks for extra crunch. Press this mixture firmly into the base of your tray to create an even, compact layer. This foundation is crucial because it holds the bars together and offers that satisfying crispness in every bite.
Step 2: Spread the Nutella Layer
Next, generously spread the Nutella over the biscuit base. It’s best to soften the Nutella slightly if it’s too thick, making it easier to spread and ensuring it melds perfectly with the base. This layer is where the magic begins – the delicious combination of chocolate and hazelnuts that defines this dessert.
Step 3: Add the Melted Chocolate
Pour your melted chocolate gently over the Nutella layer. Use a spatula to smooth it out, creating a glossy, smooth finish. This adds a rich chocolate depth and helps bind the ingredients, keeping the bars intact once chilled.
Step 4: Sprinkle the Chopped Hazelnuts and Chill
Finally, scatter the chopped hazelnuts over the chocolate surface. This final touch not only provides a wonderful contrast in texture but also enhances the nutty flavor that’s at the heart of these bars. Place the tray in the fridge and chill for about two hours until everything is set and firm.
How to Serve No-Bake Chocolate Hazelnut Bars
Garnishes
While the bars are stunning on their own, a light dusting of powdered sugar or a drizzle of extra melted chocolate can add an elegant flair when serving. Fresh berries or a sprinkle of flaky sea salt also complement the rich flavors beautifully.
Side Dishes
Pair these bars with a scoop of vanilla bean ice cream or a dollop of whipped cream for a dessert that feels indulgent yet balanced. For a lighter option, serving alongside a fresh fruit salad cuts through the richness and refreshes the palate.
Creative Ways to Present
For a fun twist, cut the bars into bite-sized squares and serve them on decorative toothpicks as party treats. Layering them in clear dessert cups with whipped cream and additional chopped nuts makes for a visually appealing parfait-style dessert that’s sure to impress.
Make Ahead and Storage
Storing Leftovers
You can keep leftover No-Bake Chocolate Hazelnut Bars fresh by storing them in an airtight container in the refrigerator. They will maintain their texture and flavor for up to five days, making them a perfect make-ahead snack or treat for later in the week.
Freezing
These bars freeze wonderfully. Simply cut into portions, wrap them individually in plastic wrap, and place them in a freezer-safe container. When ready to enjoy, thaw them in the refrigerator overnight for a perfectly preserved flavor and texture.
Reheating
Since these bars are best served chilled or at room temperature, reheating is not necessary. If they become too firm, let them sit at room temperature for 10 to 15 minutes to soften slightly before serving.
FAQs
Can I use other types of biscuits for the base?
Absolutely! Digestive biscuits, graham crackers, or any slightly sweet, crunchy cookies work well. Just ensure they are crushed finely enough to hold together but still have some texture.
Is it possible to use a dairy-free or vegan chocolate?
Yes, swapping in a vegan or dairy-free chocolate alternative works perfectly here, making this treat accessible to those with dietary restrictions without sacrificing flavor or texture.
How long do No-Bake Chocolate Hazelnut Bars take to set?
Chilling them for about two hours usually allows the layers to firm up nicely, but if your fridge is very cold, they might set a bit sooner.
Can I add other nuts or toppings?
Definitely! Feel free to try chopped almonds, pistachios, or even a sprinkle of toasted coconut to personalize your bars and add extra flavor dimensions.
What’s the best way to cut these bars without them crumbling?
Use a sharp knife warmed under hot water and wiped dry before each cut. This helps you slice cleanly through the layers without breaking apart the bars.
Final Thoughts
No-Bake Chocolate Hazelnut Bars are more than just a quick recipe — they’re a delightful treat that transforms simple ingredients into something truly special. I encourage you to give these bars a try; their perfect combination of creamy, crunchy, nutty, and chocolaty is utterly irresistible. Once you do, they’ll become one of your favorite go-to desserts, ready to impress with minimal effort.