“White Chocolate Dipped Red Velvet Cookies Recipe
“`html
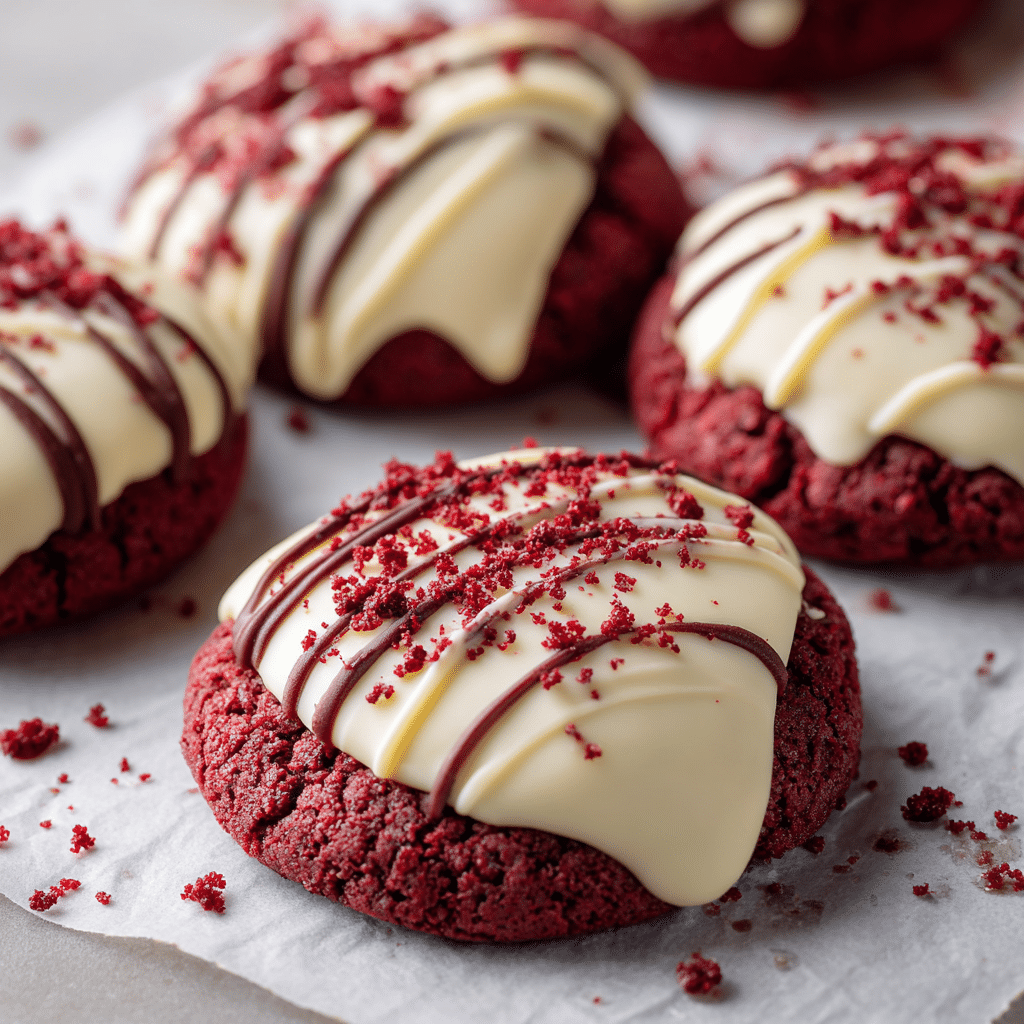
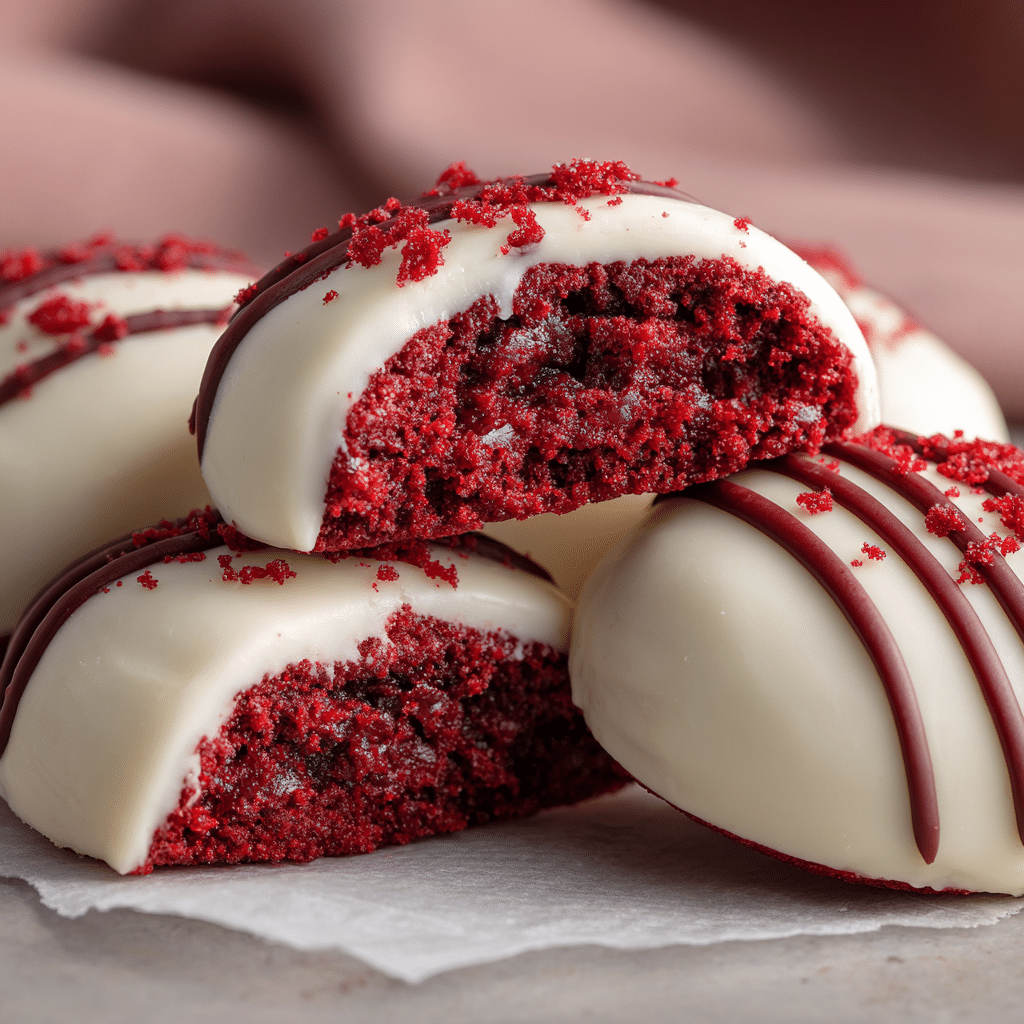
If you adore the classic rich and velvety taste of red velvet desserts, you are in for a treat with these White Chocolate Dipped Red Velvet Cookies. Imagine soft, chewy cookies with that iconic red velvet flavorbase enhanced by a subtle hint of cocoa and espresso, then generously dipped in smooth, creamy white chocolate for a beautiful, festive finish. These cookies are not just visually stunning with their vibrant color and shiny white chocolate coating, but each bite is a perfect marriage of tender crumb and sweet indulgence making them an irresistible delight for gatherings, holidays, or simply a joyous everyday snack.
Ingredients You’ll Need
The magic of White Chocolate Dipped Red Velvet Cookies starts with a handful of simple but essential ingredients, each chosen to bring out the perfect flavor, color, and texture. From the rich butter to the touch of espresso powder, each element plays a key role in achieving that unforgettable taste and chewy texture we all love.
- 1 cup unsalted butter (mostly melted): Provides richness and moisture for soft, tender cookies.
- 1 cup dark brown sugar (packed): Adds deep caramel notes and chewiness to the dough.
- 1 cup granulated sugar: Balances sweetness and helps with cookie structure.
- 2 large eggs (room temperature): Bind the dough and add moisture for a soft crumb.
- 1 tsp. red gel food coloring: Creates the iconic, vibrant red hue essential to red velvet.
- 1/2 tsp. distilled white vinegar: Reacts with baking soda to give slight lift and tender crumb.
- 1½ tsp. vanilla extract: Enhances all the flavors with a sweet, floral note.
- 3 cups all-purpose flour (spooned & leveled): Forms the cookie’s structure for perfect chewiness.
- 1/4 cup unsweetened cocoa powder: Adds the classic subtle chocolate undertone.
- 1 tsp. baking soda: Leavens cookies lightly for a soft texture.
- 1 tsp. fine sea salt: Balances sweetness and enhances all flavors.
- 1/4 tsp. espresso powder (optional): Intensifies cocoa flavor without adding coffee taste.
- ~1/4 cup granulated sugar (for rolling): Creates a pretty, crackly sugar coating on the cookie exterior.
- White chocolate melting wafers: Perfect for dipping and creating that dreamy white chocolate finish.
- Sprinkles (optional): Add festive flair and extra crunch on top.
How to Make White Chocolate Dipped Red Velvet Cookies
Step 1: Preheat and Prepare Your Baking Sheets
Start by setting your oven to 350°F (177°C) and lining two large baking sheets with parchment paper. This ensures your cookies bake evenly and come off the sheet effortlessly, keeping that perfect chewy texture intact.
Step 2: Whisk Butter and Sugars
In a large mixing bowl, whisk together the melted butter, dark brown sugar, and granulated sugar until the mixture is smooth and glossy. This step creates a luscious base that ensures your cookies are wonderfully soft with a hint of caramel sweetness.
Step 3: Add Wet Ingredients
Add the eggs one at a time, then incorporate the red gel food coloring, distilled white vinegar, and vanilla extract, whisking everything until fully combined. The red gel food coloring is the secret to that signature red velvet shade, while the vinegar and vanilla accentuate the cookie’s flavor complexity.
Step 4: Combine Dry Ingredients
In a separate bowl, whisk together the all-purpose flour, cocoa powder, baking soda, fine sea salt, and optional espresso powder. Mixing these dry ingredients thoroughly ensures even distribution so every bite bursts with flavor and the perfect crumb.
Step 5: Fold Dry Ingredients into Wet
Gradually add the dry ingredients to the wet mixture, folding gently with a rubber spatula or wooden spoon until no streaks of flour remain. Be careful not to overmix, as that can toughen the cookies. Once combined, cover the dough with plastic wrap and chill for 30 to 60 minutes—this resting period helps flavors meld and dough firm up for ideal cookie shape and texture.
Step 6: Shape and Coat Cookies
When your dough is chilled, scoop tablespoon-sized portions and roll them in granulated sugar to give the cookies a slightly crisp, sparkling exterior. Place them spaced apart on your prepared baking sheets to allow room for gentle spreading.
Step 7: Bake to Perfection
Bake the cookies for roughly 10 minutes or until they are set around the edges but still soft in the center. This short bake time keeps the cookies chewy, moist, and tender—just the way red velvet should be.
Step 8: Cool and Dip in White Chocolate
Allow the cookies to cool fully on a wire rack before dipping them halfway into melted white chocolate. The smooth, creamy coating adds a luscious sweetness that contrasts beautifully with the mildly cocoa and tangy flavor. Decorate with sprinkles if you like for an extra pop of color and festivity. Let the chocolate harden before serving or storing.
How to Serve White Chocolate Dipped Red Velvet Cookies
Garnishes
For a touch of visual charm and texture contrast, add colorful sprinkles, crushed peppermint, or even a light dusting of edible glitter right after dipping the cookies in white chocolate. These garnishes make them perfect centerpieces for dessert tables or festive treats at parties.
Side Dishes
These White Chocolate Dipped Red Velvet Cookies pair wonderfully with a warm cup of coffee, a rich hot chocolate, or a creamy glass of milk. The smooth bitterness of coffee beautifully balances the sweetness, making your snack or dessert experience even more delightful.
Creative Ways to Present
Stack these cookies in a clear, decorative jar or tie them with a festive ribbon as charming homemade gifts. You can also arrange them on a platter alongside other holiday treats for an irresistible cookie platter that will wow guests and family alike.
Make Ahead and Storage
Storing Leftovers
Keep your leftover White Chocolate Dipped Red Velvet Cookies in an airtight container at room temperature for up to 4 days. This keeps the cookies moist and the white chocolate coating firm and fresh, ready for snacking or sharing.
Freezing
You can freeze the cookie dough balls before baking for up to 3 months. Simply shape and roll them in sugar, then freeze on a baking sheet before transferring to a freezer bag. When ready, bake straight from frozen, adding a couple of extra minutes to the baking time. Alternatively, frozen finished cookies can be wrapped tightly and frozen for up to a month.
Reheating
If you want to warm your cookies and revive their softness, heat them gently in a microwave for 10-15 seconds or in a low oven (300°F) wrapped loosely in foil for a few minutes. Avoid overheating so the white chocolate doesn’t melt completely off again.
FAQs
Can I use regular red food coloring instead of gel?
Yes, but gel food coloring produces a more vibrant and intense red color without altering the dough’s consistency. Regular liquid coloring may dilute your dough slightly, so use sparingly.
What can I substitute for white chocolate melting wafers?
You can use good-quality white chocolate bars melted carefully or almond bark. Just ensure you temper or melt them gently to keep a smooth coating for dipping your cookies.
Why is vinegar used in the recipe?
The vinegar reacts with baking soda to create leavening bubbles that help lighten the cookie’s texture while also enhancing the tangy flavor characteristic of red velvet desserts.
How can I make these cookies vegan?
To adapt for a vegan diet, swap the butter for vegan butter and use a flax egg or chia egg substitute. Use vegan white chocolate for dipping, and ensure your sugar is vegan-friendly.
What is the espresso powder for?
Although optional, the espresso powder intensifies the chocolate flavor without adding any coffee taste. It’s a great secret ingredient to elevate your White Chocolate Dipped Red Velvet Cookies.
Final Thoughts
These White Chocolate Dipped Red Velvet Cookies are a truly special treat that brings joy with every bite. Whether you make them for holidays, celebrations, or just because, they never fail to impress with their beautiful appearance and irresistible taste. I can’t wait for you to try this recipe and share this little piece of red velvet happiness with your friends and family!
“`