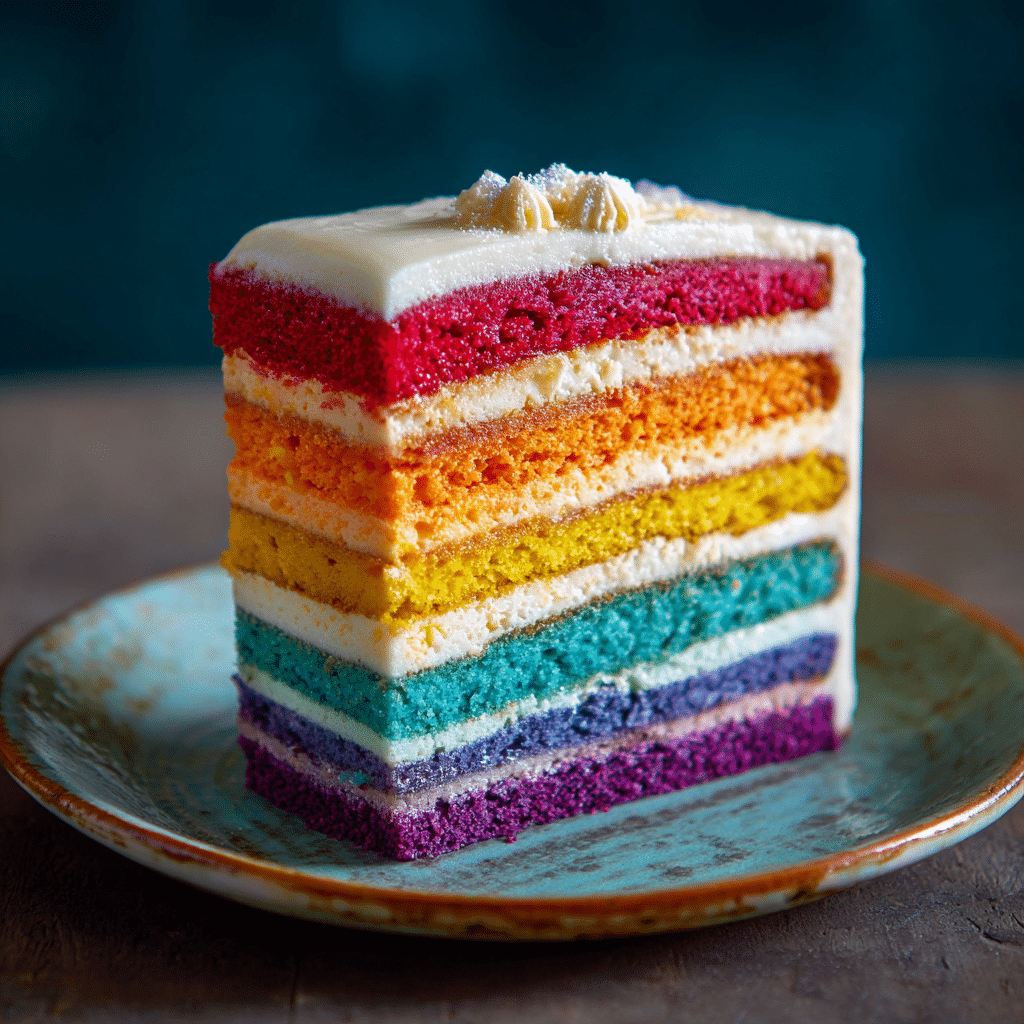
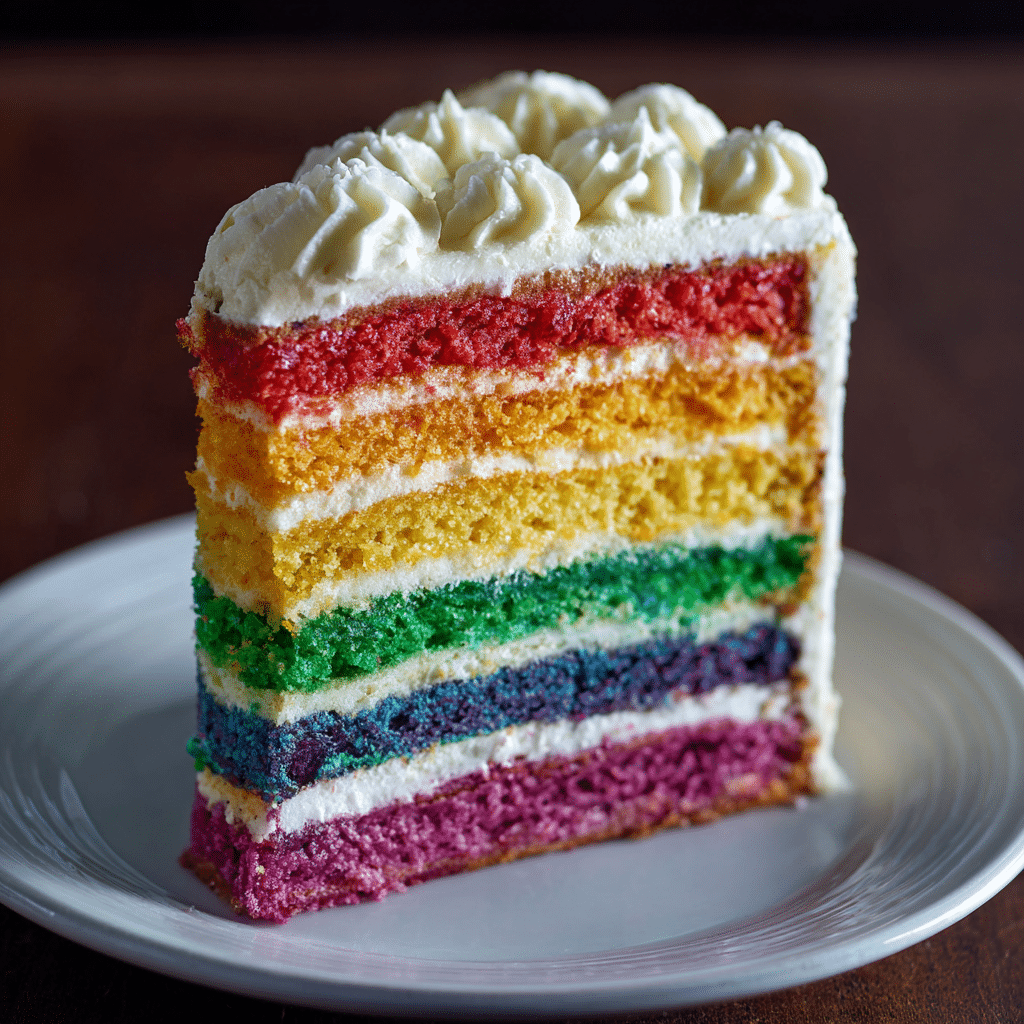
Rainbow Layer Cake Recipe
If you have a celebration coming up or simply want to brighten your day with something sweet and spectacular, the Rainbow Layer Cake is exactly what you need. This cake is not just any dessert; it’s a joyful explosion of vibrant colors stacked in perfect harmony, hiding a delightful surprise with every slice. Each layer brings a pop of color and a moist, fluffy texture that pairs beautifully with smooth, creamy frosting, making it as delicious as it is visually stunning. Whether you’re a baking newbie or a seasoned pro, this Rainbow Layer Cake will charm your taste buds and impress anyone lucky enough to share a piece.
Ingredients You’ll Need
The magic of a Rainbow Layer Cake starts with simple, straightforward ingredients, each one playing an essential role in creating those bright layers and perfect texture. From the smooth batter base to the luscious frosting, every component works together to build this edible work of art.
- Cake batter: This forms the foundation; a fluffy, tender batter that bakes evenly and holds color well.
- Food coloring: Choose vibrant gel or liquid colors to give each layer that eye-catching hue without affecting the batter’s texture.
- Frosting: A creamy, smooth frosting (like buttercream or cream cheese) that holds the layers together and adds a decadent finish.
How to Make Rainbow Layer Cake
Step 1: Prepare the Batter
Begin by making your favorite cake batter recipe or using a trusted box mix as your base. The key here is to mix it just until smooth, ensuring the texture stays tender and light. Once ready, divide the batter evenly into separate bowls, one for each color layer you want in your Rainbow Layer Cake.
Step 2: Add Color to Each Portion
This is the moment the cake really starts to come to life. Add a few drops of your selected food coloring to each bowl of batter and gently fold it in until the color is evenly distributed. Don’t be shy about adding a bit more color; vibrant layers make the cake extra exciting!
Step 3: Bake Each Colored Layer
Pour each colored batter into separate, prepared round cake pans. Bake the layers one by one, or if you have multiple pans, bake them simultaneously. Keep a close eye on baking time—it’s usually shorter for these thin layers, so test with a toothpick until it comes out clean but the cake feels springy.
Step 4: Cool and Stack
Once baked, allow all the colored layers to cool completely on wire racks. Patience here is key! After cooling, spread a layer of frosting between each cake layer to build your Rainbow Layer Cake. This frosting not only adds sweetness but also holds the layers perfectly together.
Step 5: Frost the Cake
After stacking, cover the entire cake with a generous and even coat of frosting. Smooth it out with a spatula for a clean finish, or get creative with swirls and designs. The frosting creates a beautiful contrast to the rainbow layers inside, teasing everyone about the colorful surprise within.
How to Serve Rainbow Layer Cake
Garnishes
Finishing touches like colorful sprinkles, edible glitter, or a handful of fresh berries can elevate your Rainbow Layer Cake even more. These elements add texture and accentuate the cake’s festive vibe, making it irresistible.
Side Dishes
Pair your slice with light, complementary sides such as fresh fruit salad, fluffy whipped cream, or a scoop of vanilla ice cream. These choices balance the cake’s sweetness and enhance the overall dessert experience.
Creative Ways to Present
Try serving the Rainbow Layer Cake on a beautiful cake stand or sliced and arranged on colorful plates to match each layer. You could even offer it as mini individual cakes by cutting the layers into smaller rounds—a fun twist perfect for parties or gatherings!
Make Ahead and Storage
Storing Leftovers
Keep any leftover Rainbow Layer Cake covered tightly in the refrigerator. Properly stored, it will stay moist and fresh for up to four days, allowing you to enjoy that festive burst of color and flavor whenever you want.
Freezing
If you want to save the cake for later, slice it into individual portions and wrap each piece carefully with plastic wrap before placing them in an airtight container in the freezer. The Rainbow Layer Cake can be frozen for up to 3 months without losing its charm.
Reheating
For best taste, thaw frozen slices in the refrigerator overnight. Bring to room temperature before serving to enjoy the frosting’s softness and the cake’s delightful texture that makes this Rainbow Layer Cake so special.
FAQs
Can I use natural food coloring for the Rainbow Layer Cake?
Absolutely! Natural food colorings made from ingredients like beet juice or spirulina can create beautiful, vibrant layers, though the colors may be softer than artificial ones. Experiment to find the balance you like best.
What type of frosting works best for this cake?
Buttercream is a classic choice due to its creamy texture and stability, but cream cheese frosting or even whipped ganache work wonderfully if you want something less sweet or tangier.
Do I have to bake each layer separately?
Yes, for a true Rainbow Layer Cake effect, it’s best to bake each colored layer separately to avoid colors mixing. Using multiple pans or baking in batches will give you the brightest, most defined layers.
Can I make this cake gluten-free?
Definitely! Substitute your regular flour with a reliable gluten-free baking mix, and be sure to check that other ingredients, like frosting, are gluten-free too. The texture might vary slightly, but the beauty and taste will still shine through.
How do I prevent the colors from bleeding into each other?
Make sure your cake layers are fully cooled before stacking and frosting. Use a firm frosting to “seal” each layer before stacking to minimize any color bleeding and keep those vibrant hues distinct inside the Rainbow Layer Cake.
Final Thoughts
There is something truly magical about slicing into a Rainbow Layer Cake and revealing those bright, beautiful layers stacked just for you. It’s a cake that makes every occasion feel a little brighter and every gathering a bit more joyful. I hope you’ll give this recipe a try, bringing a little burst of color and happiness into your kitchen — your taste buds will thank you!